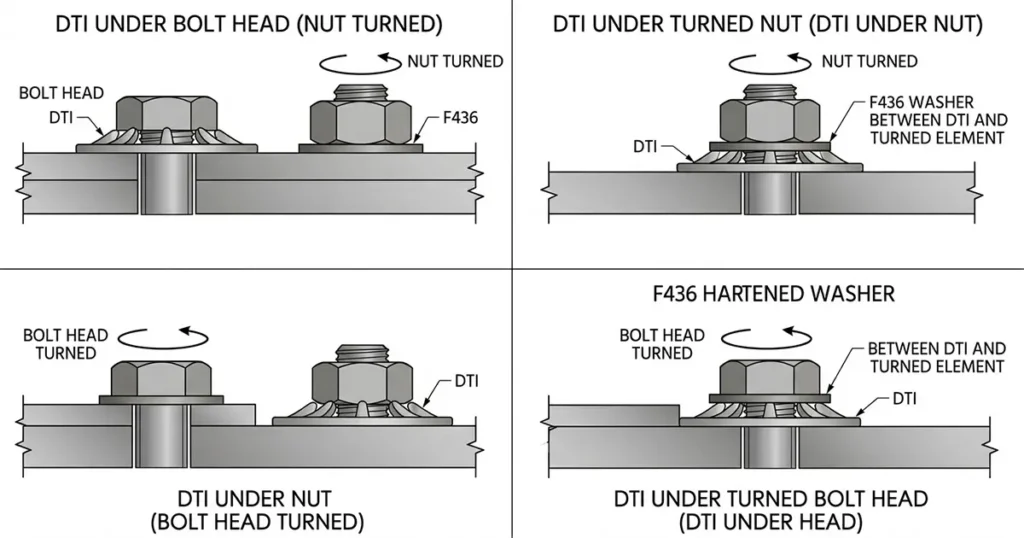
DTI washer installation comes down to two things that have to be right at the same time: the washer must sit the correct way round on a hardened bearing surface, and the assembly must be tightened until the gaps between the protrusions reach the acceptance condition. In the arrangement FHWA recommends for bridge structural steel, the DTI sits under the bolt head and the nut is turned. Other arrangements are permitted, and the washer stack changes with them.
That is the mechanical part. The procedural part is that a DTI is only evidence if someone checks it: the inspector confirms the stack-up, then offers a feeler gauge to the gaps and judges the result against the project’s acceptance criteria. How the protrusions indicate tension is covered separately; this guide deals with putting the washer in and proving it is there. Self-indicating DTIs add a visible silicone signal, but the signal supports that inspection rather than replacing it.
The rules for a given job come from the project specification, from the RCSC Specification for Structural Joints Using High-Strength Bolts (2025 edition), or from AASHTO bridge construction requirements where the work is a highway bridge, and from the DTI manufacturer’s installation instructions. This guide follows ASTM F959/F959M, the product standard for the washers themselves, and concentrates on the sequence a crew and an inspector actually work through.
Before the first bolt: four things to settle
Production bolting should not start until four points are closed out. Each one is cheaper to fix now than after the wrench has moved on.
- The washer matches the assembly. The type is tied to the bolt, not chosen by diameter alone. Type 325-1 serves F3125 Grade A325 Type 1 bolts and F1852 assemblies, 325-3 their weathering equivalents, 490-1 and 490-3 serve A490 and F2280 assemblies, and the metric 8.8 and 10.9 types serve A325M and A490M bolts. The current edition is F959/F959M-26, published in March 2026, which replaced F959/F959M-17a(2023). A Type 325 washer under an A490 bolt flattens before the bolt reaches its required tension; a Type 490 washer under an A325 bolt stays open at the tension that bolt is designed for.
- The lot is traceable. Cartons should carry the manufacturer, type, size and lot number, and the lot should be backed by a compression-load test report. DTI test reports are lot documents rather than shipment certificates, so the reference has to match the carton on the dock, not just the order.
- The configuration is decided. Which element will be turned, where the DTI sits, whether an F436 washer goes between the turned element and the DTI, and whether the hole is standard, oversized or slotted and therefore needs a plate washer. The same configuration then has to be used in verification and in the actual connection; a test run built differently proves nothing about the work.
- Pre-installation verification has been done. Not fewer than three complete assemblies for each combination of diameter, length, grade and lot are tested in a bolt tension measuring device, using the same bolt, nut, washer, DTI and wrench that the work will use. Tighten each assembly to the pre-installation verification tension in RCSC Table 7.1, then use the correct-thickness feeler gauge supplied by the DTI manufacturer to confirm that the gauge enters the minimum number of gaps required by Table 7.2. Continue tightening until the gauge cannot be inserted in at least one more gap, then confirm that the assembly still reaches the Table 7.1 tension. If the gauge-entry count or the final tension requirement cannot be met, establish and resolve the cause before production bolting. Record the gauge thickness and the result.
That test checks the assembly and the procedure, not the washer’s conformity to F959/F959M. It is the only stage at which the exact combination of components and tooling is proved together, which is why the configuration used in the test has to be the configuration used in the steel.
Orientation: protrusions against a hardened surface
F959/F959M states the orientation directly: the DTI is intended for installation with the protrusions against a hardened surface such as a bolt head, a hardened nut, or a hardened washer. The flat face goes against the steel; the protrusions go against the hardened part that will compress them. A DTI that sits with its protrusions against the structural steel is not indicating anything useful, because the protrusions press into the softer plate and the steel yields before the washer’s own geometry does.
The hardened surface matters for a second reason. A DTI is typically softer than a through-hardened ASTM F436 washer, so it is not a substitute for one. Where the connection requires a hardened or plate washer — at an oversized or slotted hole, or wherever the design calls for one — that washer stays in the assembly, and the DTI sits on top of it.
The bearing surface also has to be sound. Paint, mill scale, grit, weld spatter, burrs or a raised hole edge under the flat face hold one side of the washer away from the steel, and the result is a lopsided gap pattern that looks like partial tightening on one side and full closure on the other. Clean the seat, dress burrs, and replace a DTI whose protrusions have been damaged before it goes in.
Position and washer stack
FHWA recommends, for bridge structural steel, placing the DTI under the bolt head of assemblies that will be tightened by turning the nut. Two reasons are given. The indicator then reflects tension along the full length of the bolt, and a bolt that has been pinched between the steel plies — trapped by drift pins removed too early or by inadequate snugging — can be detected because its DTI will not close as expected. FHWA also notes that a DTI placed under the turned element may give a slightly less accurate indication, because the hardened washer can stick to the turned element and slide across the protrusions.
The alternative is equally established: put the DTI under the nut and turn the bolt head. FHWA describes this arrangement as acceptable when tightening is done from the head side, with the same benefit of detecting trapped bolts, and manufacturer instructions and state requirements permit other configurations as well. What is not optional is that the verification test matches whichever arrangement will be used in the work.
ASTM F436 washer placement follows the DTI’s position relative to the turned element:
- DTI under the turned element. A hardened F436 washer goes between the turned element and the DTI, so the rotating part bears on the washer and never grinds directly on the protrusions.
- DTI under the unturned element. The DTI does not by itself create a washer requirement under the turned element. Any washer there is governed by the normal rules for the bolt type, coating and hole condition.
| Turned element | DTI sits under | Protrusions bear on | F436 washer created by the DTI |
|---|---|---|---|
| Nut | Bolt head (FHWA recommendation) | Underside of the bolt head | None between DTI and head; any washer under the nut follows the assembly requirements |
| Nut | Nut (turned) | F436 washer under the nut | Yes — between the nut and the DTI |
| Bolt head | Nut (unturned) | Face of the hardened nut | None between DTI and nut; any washer under the head follows the assembly requirements |
| Bolt head | Bolt head (turned) | F436 washer under the head | Yes — between the head and the DTI |
Holes add a separate requirement. At oversized and slotted holes, a hardened washer or plate washer is required even when a DTI is used; FHWA states this for steel bridgework, and the principle is the same wherever the project specification calls for a plate washer. The DTI must sit on the washer, not directly over the unsupported opening. For bolts 1 in. and larger, FHWA points out that a standard through-hardened washer can have an inside diameter 1/8 in. larger than the bolt, which leaves the DTI under-supported and can produce an erroneous indication; in those cases, FHWA’s guidance is to use plate washers or special hardened washers with an inside diameter 1/16 in. larger than the nominal bolt diameter.
Installing, step by step
- Prepare the joint. Bring the plies together, align the holes, remove drift pins, and check that the faying surfaces and the bearing seats are clean and sound. A DTI cannot pull a joint together that should have been assembled first.
- Build the stack. Place the DTI with its flat face against the steel and its protrusions against the hardened surface, following the table above. Add the F436 washer on the turned side where required, and the plate washer over an oversized or slotted hole. Check that the washer is centred and fully supported, not bridging a gap.
- Snug the joint. Tighten the assemblies enough to bring the plies into firm contact, working from the most rigid part of the connection outward. Snugging should not consume the DTI’s travel: before final tensioning, the gauge should still enter the required number of gaps. If it no longer does, the washer was compressed while the plies were still closing, and it should be replaced rather than tightened further.
- Hold the unturned element. A second ironworker holds the bolt head or nut that is not being turned. This stops the assembly rotating as a unit and keeps the tension developing along the full bolt length. FHWA is explicit that using DTIs does not relieve the contractor of this step, and the person holding the unturned element is also well placed to watch the gaps close.
- Tension to the acceptance gap. Tighten the turned element and watch the gaps close progressively around the washer. Stop when the acceptance criterion is met — the gauge refused in the required number of gaps. Extra rotation after that point stretches the bolt without adding useful information, and on a DTI that has already closed it only makes the installation harder to assess.
- Mark and record. Mark or record the bolts as the project requires, and log the gauge thickness and the result. The record is what an inspector, the engineer of record or a later audit has to work from.
Inspection: what to look at and what to measure
Inspection has three parts: a visual check of the assembly, a gauge check of the gaps, and a record of both. FHWA splits the work between the crew, who check the gaps during tightening, and the project inspector, who performs the quality assurance check afterwards with a gauge and a visual survey of the connection.
The visual check
- Orientation. Protrusions against the hardened bearing surface, flat face against the steel. A reversed washer is a reject, not a re-tension.
- Stack-up. The F436 washer is on the turned side where the DTI is under the turned element, the plate washer is present at an oversized or slotted hole, and the DTI is not standing in for a hardened washer anywhere.
- Seating. The washer sits flat and centred, with no gap visible around the perimeter and no sign that it is bridging a burr, paint ridge or hole edge.
- Condition. Protrusions are not flattened, cracked or scored, and the coating is intact. A washer that arrived damaged or was damaged during snugging is replaced.
- Gap pattern. Closure should be even around the ring. Open gaps concentrated on one side point to a seating problem rather than to insufficient tightening.
The feeler gauge check
The gauge thickness is the job inspection gap: the gap at which the DTI is taken to indicate the required tension. It is established through pre-installation verification and stated in the project procedure, and the manufacturer supplies the gauge matched to its product. Many structural and bridge specifications use 0.005 in. (0.13 mm), but the value that governs is the one written into the project specification for the DTI being installed, not a number carried over from another job.
Offer the blade to each space between adjacent protrusions, between the DTI and the bearing surface, and push it toward the centre of the bolt. If the blade enters, that gap is still open. If it stops at the edge, the gap has refused the blade. Work around the washer rather than testing one convenient spot, and count the refusals.
The acceptance rule comes from the applicable project specification. Where RCSC 2025 governs, the installation must satisfy Section 8.2.3 and the maximum number of feeler-gauge insertions in Table 8.2: for a DTI with eight gaps, the gauge may enter no more than three gaps, so at least five gaps must refuse it. Other gap counts are judged against the corresponding entry in that table, and a stricter project requirement governs where one applies. If the count falls short, continue tightening and recheck. If the gaps will not close, stop and establish why before adding more turns: the washer may be the wrong type, the bolt may be trapped, the DTI may already be fully compressed, or the bearing surface may be holding it off.
A washer that refuses the blade at every gap has gone past the indication point. That is not, on its own, a reason to reject the bolt under RCSC, but it does call for a check of the nut and bolt for stripping or cracking, and for whatever the project procedure says about a fully compressed DTI. A washer that still accepts the blade in every gap after the specified tightening has not reached the acceptance gap, and cannot be accepted as installed.
Self-indicating DTIs
Some DTIs carry a compressible insert, usually silicone, within the protrusion pattern. As the protrusions flatten, the insert is extruded into the gaps and becomes visible around the washer, so compression can be seen without a blade. The extrusion point is set by the manufacturer, and the washer is read against the manufacturer’s written instructions.
It is a useful visual aid, particularly where access or light makes a gauge awkward, but it is an added feature rather than a requirement of F959/F959M. Treat the extrusion as confirmation that the washer has compressed, not as proof that the stack-up was correct, and not as a substitute for the gauge where the project requires one. If extrusion appears during snugging, the washer has compressed earlier than intended; treat it as a replacement item rather than an accepted one.
Where DTI installations fail
Most field problems repeat, and most of them are visible before the gauge is applied.
| What you see | Usual cause | What to do |
|---|---|---|
| Gaps open on one side, closed on the other | Washer tilted, or paint, grit or a burr under the flat face | Clean and dress the seat, replace the DTI if the protrusions are damaged, re-tension |
| Gauge still enters every gap after full tightening | Wrong DTI type for the bolt, DTI reversed, or tension not reached | Check type and orientation; continue to the specified tension; replace the wrong part |
| DTI closed during snugging | Plies not brought together before final tensioning | Replace the DTI and re-snug the joint |
| Bolt rotates while the nut is turned | Unturned element not held | Hold it and redo the assembly; check for a trapped bolt |
| Protrusions flattened or scored | Turned element bearing directly on the DTI, with no F436 washer between them | Correct the stack and replace the DTI |
| DTI cracked or dished at a slotted or oversized hole | No plate washer; the DTI is unsupported over the opening | Add the hardened or plate washer and replace the DTI |
| Silicone visible but the gauge still enters | Insert extruded early, or read at the wrong stage | Do not accept on the insert alone; inspect with the gauge as the project requires |
| Washer reused from an earlier tightening | Protrusions already compressed; no calibrated travel left | Fit a new DTI |
What the order has to carry
None of this works if the wrong box arrives. An order line should name the standard and edition, the DTI type, the nominal size and whether it is the inch or metric series, the coating, lot marking on every carton, and a compression-load test report for each lot. ChinaBolts supplies ASTM F959/F959M DTI washers in the eight types and both series, and the F436 hardened washers that the stack may call for are a separate line on the same order. The wider washers range covers the plate and structural washers used at oversized and slotted holes.
A DTI leaves evidence that can be checked after the wrench has moved on, which is the reason to use one. That evidence is only worth reading if the washer went in the right way round, on the right stack, and was tightened to the gap the project actually specified.