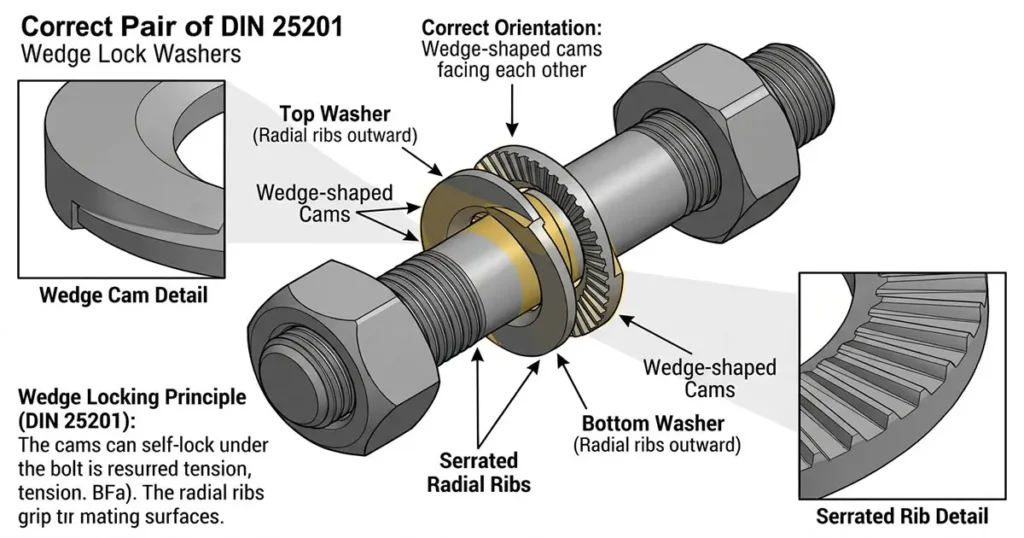
The pair goes cam face to cam face, with the serrated faces outward: one against the bolt head or nut, one against the joint surface. That is the answer to the question most people bring to this part — which way do you put on a lock washer — and it is the step that is easiest to get wrong, because a single washer has no correct orientation at all: the pair is the locking element.
A DIN 25201 wedge lock washer is supplied as a matched pair, normally bonded together so the two halves stay stacked in the box. Each washer carries wedge-shaped cams on one face and radial ribs on the other. Stacked cam to cam, the pair can climb its own cams; stacked rib to rib, or with the cams bearing on the joint, the locking function is gone before the bolt is tightened.
This article covers the installation itself: orientation, where pairs are needed, the surface conditions the ribs depend on, and what sets the tightening torque. It does not explain the wedge mechanism in detail, and it does not replace the joint specification.
Which way do you put on a lock washer?
The question has two different answers, and which one applies depends on the washer in your hand. A split lock washer has no functional top or bottom: the split is a spring feature, and the washer works the same way up. A wedge-locking pair does have a fixed orientation, set by its two faces.
| Face | Must face | What it does |
|---|---|---|
| Cam face (wedge ramps) | The cam face of the other washer | Lets the pair climb and expand when the joint tries to loosen |
| Serrated face (radial ribs) | The bolt head or nut, and the joint surface | Embeds in the contact surface so the washer cannot rotate with the fastener |
A physical check takes a few seconds. Hold the two washers cam to cam and twist them against each other: they ride up and the stack thickens. Do the same with the ribs together and nothing happens. On a bonded pair the check is that the bond still holds the cams together. If the pair has come apart in the box, inspect both faces before restacking it, because two washers put back in the wrong order still look like a pair from the side.
Do not add a plain washer between the ribbed face and the joint unless the joint design calls for it. It puts a sliding interface under the ribs and changes what they grip; the pair is designed to sit directly on the two surfaces it locks.
Where the pair goes
How many pairs a joint needs depends on how the joint is built, not on the washer. Work from the joint drawing rather than from the bolt size alone.
| Joint arrangement | What to fit | What to check |
|---|---|---|
| Bolt into a tapped hole | One pair under the bolt head | Full, flat bearing face around the hole |
| Bolt and nut through a clearance hole | Two pairs: one under the head, one under the nut | Both fasteners are locked; with one pair, the unlocked fastener can still rotate |
| Stud screwed into a tapped hole, nut on the free end | One pair under the nut | The stud’s installed end is anchored as the specification requires, otherwise the stud unwinds instead of the nut |
| Counterbored or recessed seat | One pair seated in the counterbore | Washer outside diameter clears the counterbore and sits flat in it |
| Slotted, oversized or soft bearing area | Enlarged outside diameter pair, with a flanged nut or bolt head where the design permits | The ribs land on material, not on the slot or on air |
Two details are easy to miss. The pair adds stack height — two washers rather than one — and that comes out of the thread available at the nut or in the tapped hole, so check thread engagement with the pair fitted. And in a through-hole joint the two pairs are separate locking elements, not one: each has to be seated by its own fastener.
Surfaces the ribs can and cannot grip
The ribs work by embedding, which makes the mating surface part of the locking system. Three conditions decide whether it cooperates.
Hardness runs one way. The washer has to be harder than the surface it grips. A hardened or case-hardened component, a chrome-plated or hard-coated face, or a hardened plain washer already in the stack can be harder than the locking washer; the ribs then polish the surface instead of biting it, and the pair becomes a friction joint with an extra interface. At the other extreme, wood, plastic covers and thin sheet give the ribs nothing to hold and may deform under the washer.
The seat has to be flat and clean. Paint, scale, a raised weld, a burr around the hole or a dished or damaged face holds the washer off the surface, and a pair that is not seated cannot control the joint. Clean both contact faces, check that they are flat across the washer’s bearing area, and remove burrs rather than tightening over them.
There has to be material under the ribbed face. The outside diameter has to cover the clearance hole and land on the joint, not on its edge. On a slotted or oversized hole, or against a soft surface, an enlarged outside diameter pair distributes the load over more material and a flanged nut or bolt head supports it; a standard pair over a slot may touch only two narrow strips.
On coated assemblies, expect the ribs to cut through the coating where they bite. That is how the product works, but it is also a touch-up point that the specification may need to cover.
Tightening: sequence first, then torque
Tightening is what loads the pair, and the sequence matters as much as the number on the wrench.
In a through-hole joint with a pair on each side, take up the cams on both pairs before the final torque: turn the bolt and the nut until both pairs have climbed onto their ramps, then hold the nut and torque the bolt. Turning both fasteners before final tightening closes the cams on both washer pairs and helps minimize settlement. During final tightening, the specified preload clamps both pairs even though the nut is held while the bolt is torqued. In a tapped hole there is only one pair, under the head, and it is loaded as the bolt is tightened.
The torque value itself does not come from the washer. Naming a washer DIN 25201 does not produce a tightening torque: torque is set by bolt size and property class, the friction in the threads and under the bearing face, and the preload the joint needs. That value belongs in the joint specification, and on a rail-vehicle joint it may be tabulated in the applicable standard. If no torque is specified, it has to be derived for the joint — it cannot be read off a washer catalogue.
Lubrication belongs to the same decision. A torque figure is only valid with the friction conditions it was calculated for, so changing from dry to lubricated assembly, or adding anti-seize to make a large or stainless joint easier to tighten, changes the preload that the same torque produces. Re-establish the torque instead of reusing the old figure.
None of this makes the washer a substitute for preload. If the bolt has not reached the preload the joint specifies, the pair is securing a joint that is already loose.
Six installation errors that stop the pair working
Most of these are visible only after the joint has been opened again, which is why they are worth checking at assembly.
- One washer instead of a pair. A single washer has cams on one face and ribs on the other; it has nothing to climb, and it cannot lock.
- Cam to rib. Two washers stacked with the ribs facing each other, or with the cams bearing on the joint, are assembled but not locking.
- A pair under one fastener only. In a bolt-and-nut joint, locking the head leaves the nut free to rotate; both sides need their own pair.
- A pair that is not seated. Paint, a burr, a counterbore that is too small or a washer bridging a slot keeps the ribs off the surface.
- A surface harder than the washer. The ribs cannot embed, so the joint behaves like a friction joint with an extra interface.
- Mixed or damaged washers. Two halves from different sizes or lots, a flattened rib, a worn cam or a washer deformed by earlier over-tightening.
Reuse is a separate decision. A pair can generally go back into service if both washers are intact — cams not worn flat, ribs not crushed, no corrosion or deformation — but both halves have to be checked, and manufacturers do not normally publish a reuse count after which a pair must be replaced. Judge the condition, not the number of assemblies.
When a wedge-locking pair is the wrong choice
Wedge-locking washers are used where vibration, transverse movement and dynamic load are the reason fasteners come loose, which is why they are common on rail vehicles, machinery and equipment. They are not universal.
- Mating surfaces that are not fixed relative to each other, so there is nothing for the ribs to resist against
- A surface harder than the washer, where the ribs cannot embed
- Very soft material without a load-spreading support, such as wood or plastic
- Joints with very large settlements, where the loss of preload comes from the joint rather than from the fastener rotating
- Joints whose specification excludes additional washers, for example where stack height, grip length or electrical contact is controlled
In those cases the answer is a different locking element or a different joint design, not a tighter bolt. Serrated, toothed and spring washers are other families with their own limits, and the washers range is organised by type rather than by standard number.
What the DIN 25201 designation does not give you
A box marked DIN 25201 carries a product designation, and it is worth knowing what the number behind it refers to. DIN 25201 is not a washer product standard: it is a seven-part German design guideline for bolted joints on railway vehicles and their components. Part 4, “Securing of bolted joints” (2021-11), deals with preventing loosening, and Part 7 (2004-06, with a corrigendum of 2007-06) deals with installation. What the series actually covers, and which edition of each part applies, is set out separately in what DIN 25201 covers.
The framework has also moved to European level. EN 17976:2024, prepared by CEN/TC 256 “Railways applications”, addresses the design, assembly, quality and maintenance of mechanical and electrical bolted joints on rail vehicles. It was published in Germany as DIN EN 17976:2025-03, and DIN is aligning Part 4 with it through a draft revision, E DIN 25201-4:2026-09. The parts themselves remain published; DIN 25201-4:2021-11 is the edition currently listed.
Three practical consequences follow for the person doing the installation. The designation does not fix the torque, the hardness or the dimensions — those come from the product drawing and the joint specification. On a rail-vehicle joint, the standard the project names governs, and fitting a washer correctly does not by itself make the joint compliant. And “DIN 25201 tested” is not a test report: where loosening resistance is the claim, the question to ask is which test, to which procedure, with what result.
The checks worth making before the cover goes back on
Correct installation reduces to four checks: the pair is complete and stacked cam to cam, every fastener that can rotate has its own pair, both contact surfaces are flat, clean and softer than the washer, and the joint is tightened to the torque its specification gives. The rest of this article is detail around those four.
Where the pair is being specified rather than fitted, the DIN 25201 wedge lock washers page lists the sizes, materials and finishes available for these joints. Send the joint drawing with the enquiry so the pair is matched to the seating area, and the stack height is confirmed before the bolts are ordered.