A hammer drive anchor is a two-part, light-duty mechanical anchor that is set with a hammer. It consists of a tubular anchor body and a preassembled drive pin or nail. The anchor is placed in a drilled hole in concrete or masonry, with the head of the anchor body bearing on the fixture, and the pin is then struck until it is fully driven into the body and its head sits flush with, or slightly below, the body head. As the pin travels down the body, it forces the lower end of the anchor outward against the wall of the hole, wedging the assembly in place and clamping the fixture between the body head and the substrate.
That single mechanism explains almost everything else about the product: why it installs so fast, why the drilled hole is matched to the anchor diameter rather than to a screw, why it is a light-duty anchor rather than a structural one, and why it performs well in solid concrete and poorly in hollow or porous masonry.
This guide covers the two components, how installation works and what goes wrong, the substrates and applications the anchor suits, when another anchoring system is the better choice, the terminology that causes most ordering mistakes, and the information a supplier needs in order to quote the right item.
The two parts, and what each one does
The anchor body is a short tube, typically cast in zinc alloy, with a flange or head at the top and a section at the base that is designed to split or splay. The drive pin is supplied already inserted part-way into the body. The pin is made of harder material than the body — commonly hardened or zinc-plated carbon steel, with stainless steel available — because it has to transfer hammer energy into the softer alloy without deforming itself.
Two details of that geometry matter commercially.
- The anchor body’s head bears on the fixture. The body head — the flange at the top of the anchor — is the bearing surface, and it is sized to bear on the face of the bracket, clip or strap rather than pass through it. The fixture’s own hole must therefore be large enough to clear the anchor body, to the size the manufacturer specifies, and not merely large enough for the drive pin. The body sits in the base material with its head against the fixture face, and the drive pin is driven down inside the body. As the pin expands the base of the body, the assembly is pulled tight, clamping the fixture between the body head and the substrate. That is why one anchor diameter can serve a range of fixture thicknesses: the thickness is taken up by the difference between body length and pin length, not by the anchor diameter.
- The drive pin finishes within the body. The pin does not stand proud of the anchor when the fixing is complete. It is driven until its head sits flush with, or slightly below, the head of the anchor body, so the visible fixing is the body head bearing on the fixture and the pin head sitting level with it. This is the appearance a completed set should have, and manufacturer instructions should be followed for the exact finished position.
- The anchor body’s diameter must match the drilled hole. There is no clearance hole for the body. In a hammer drive design the body is made to sit in a hole of nominally the same diameter, so hole size and drilling accuracy control whether the anchor develops its expansion force at all. This is the opposite of a screw-type concrete fastener, where hole diameter is a tolerance on a thread.
Grip range: the number that matters more than length
Hammer drive anchors are catalogued by diameter and overall length, but the figure that decides whether a given item will fasten a given bracket is grip range — the range of fixture thickness the anchor can clamp. Because the pin has to reach down into the body far enough to expand it, a longer anchor is not simply a stronger one: total length, body length and pin length vary together, and grip range is the resulting usable window.
The table below is drawn from the published catalogue data of one United States manufacturer, Nova Fasteners, for its zinc alloy hammer drive line, and shows how the windows step up in practice.
| Anchor diameter | Overall lengths | Hole size in base material | Grip range (fixture thickness) |
|---|---|---|---|
| 3/16 in. | 7/8 in. | 3/16 in. | 0 – 1/8 in. |
| 1/4 in. | 3/4 in., 1 in., 1-1/4 in., 1-1/2 in., 2 in., 2-1/2 in., 3 in., 4 in. | 1/4 in. | 0 – 1/8 in. up to 1-1/2 in. – 3 in., depending on length |
Two practical consequences follow. First, a quoted length without a quoted grip range is an incomplete specification: a 1/4 in. × 1-1/2 in. anchor covers a 1/2 in. to 3/4 in. fixture, while a 1/4 in. × 1 in. anchor of the same diameter and material covers 1/8 in. to 1/4 in. Second, grip ranges are manufacturer-specific, because they depend on that manufacturer’s body and pin design. Substituting one brand for another on diameter and length alone can leave the fixture unclamped or the pin unable to seat.
How installation works, and what goes wrong
Setting a hammer drive anchor is as short a procedure as any anchor type offers:
- Drill a hole of the specified diameter, perpendicular to the surface, to the required depth.
- Clean the hole of dust and debris.
- Position the fixture. Its hole must be large enough to clear the anchor body, at the size the manufacturer specifies, and not only large enough for the drive pin.
- Insert the anchor through the fixture into the base material, so that the head of the anchor body bears on the fixture face.
- Strike the pin with a hammer until it is fully driven and its head sits flush with, or slightly below, the head of the anchor body.
Because the pin travel is short and the hammer blow is delivered in one movement, this is one of the few anchoring methods where a competent installer can set dozens of anchors a minute. That speed is the product’s main advantage, and it is also the source of its main failure mode: over-driving. Continuing to strike after the pin has seated cannot increase holding capacity. In weaker masonry it damages the substrate around the anchor, and because the anchor is not designed to come out and be reset, an over-driven anchor in a damaged hole often means relocating the fixing.
A set that has gone correctly leaves the pin head flush with, or slightly below, the head of the anchor body, with the body head firm against the fixture face, no movement when the fixture is pulled or rocked, and no cracking around the hole.
Overhead work needs a different level of care
Hammer drive anchors are used overhead for clips, hangers and conduit supports in solid slabs and beams, but the setting action makes an overhead application less forgiving than a downward one. The anchor depends on a hammer blow, the pin is a separate loose part until it is driven home, and any pin or anchor that misses its hole becomes a falling object. In a downward installation a badly set anchor is usually visible and can be repositioned; overhead, the same mistake may not be visible at the time and is harder to correct afterwards.
That is a reason for scrutiny, not a blanket prohibition, and the practical controls are straightforward: confirm the substrate is solid at each fixing point rather than only at the first one, keep the work area below clear, drive the pin fully home in single controlled strikes rather than a rapid series, and check each anchor immediately. Where a project has overhead fixing points in thin slabs, mixed substrates or vibration-exposed services, a threaded anchor that can be tightened and inspected — or a ceiling anchor intended for that duty — is the safer specification. Not every hammer drive design is intended for overhead use, and manufacturer documentation should be checked for the specific item rather than assumed from the product name.
Where hammer drive anchors work well
The mechanism relies on radial pressure against the wall of the hole. Any substrate that can resist that pressure locally and continuously will hold the anchor; anything that cannot will not, regardless of the anchor’s size. That single principle sorts the suitable substrates from the unsuitable ones, and it is why manufacturers describe the product as suitable for solid, dense base materials — concrete, block, brick and stone among them — rather than for masonry in general.
Typical applications are the light, static, repetitive fixings of the electrical, mechanical and signage trades: conduit straps and clips, cable clamps, electrical boxes and enclosures, nameplates and signs, light-duty brackets and trim, and general maintenance hardware. What these have in common is low load, little or no dynamic input, and a need to fix many identical items quickly. Hammer drive anchors are poorly matched to structural connections, safety-critical attachments, machinery subject to vibration or shock, or anything where a failed fixing has consequences beyond the fixing itself.
Where they should not be used
Hollow and porous substrates
Hollow brick, cored block with thin walls, and low-density or porous concrete are the clearest exclusions. In these materials the expansion force has nothing solid to react against: the anchor either splays into a cavity, where no wedging can develop, or crushes the pore structure or thin wall around it. The result is a low or unpredictable pull-out value, and aggressive driving can crack or shatter the masonry itself. Products such as chemical anchors with a mesh sleeve, or purpose-made nylon masonry plugs, exist precisely because they work on a different principle and are the appropriate choice in these materials.
High or safety-critical loads
A hammer drive anchor is a light-duty fastener. It has no threaded element to tension, no post-installation torque check, and no engineered load table that a designer can apply to an arbitrary substrate. If a connection needs a specified tension or shear capacity, edge distance and spacing verification, or documented inspection, the project needs a different anchor type and the published design data that goes with it.
Fixings that may need to be removed or adjusted
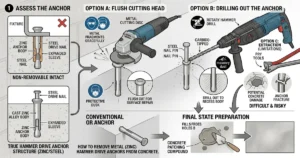
Setting is essentially one-way. Once the pin is driven, the anchor body is wedged against the hole wall and the pin is not designed to be extracted and reused; removal generally means cutting or drilling the pin out and abandoning the anchor in the substrate, then drilling a fresh hole. For any fixing point that may need to be shimmed, re-tensioned or taken apart later, a threaded anchor is the more practical specification.
Sizes, materials and standards: what is and is not standardised
Hammer drive anchors are not covered in practice by a single worldwide dimensional product standard in the way that, say, a hex bolt is. Manufacturers publish their own catalogues with their own diameter, length, grip range and hole size data, which is why catalogue figures have to be read item by item rather than assumed from the product name.
A recognised government specification does exist for the product family. CID A-A-1925A, Shield, Expansion (Nail Anchors), is the Commercial Item Description for nail-anchor expansion shields and supersedes the earlier federal specification FF-S-325 for this product type. Its dates need to be read carefully: the document was originally published on 25 July 1995, while the revision date carried by the current A-A-1925A version is 28 June 2006. A further notice, Notice 3 of 13 February 2018, validated the document, confirming that the version then in force remained acceptable for procurement at that date. Because those notices are issued periodically, the document’s present status should be checked in the DLA ASSIST database before it is relied on as the currently effective version. It is a United States federal Commercial Item Description, not an international product standard, and products are not automatically compliant with it: some manufacturers state that a specific line meets it, and most catalogue sheets make no such claim. Buyers who need documented compliance should ask for it in writing against the exact item, not against the product category.
The variables worth confirming on a purchase order are diameter and length, grip range, hole size, body material, pin material and finish, and head style. Zinc alloy bodies — often described in trade literature as Zamac or Zamak — are the common choice, with plain or zinc-plated carbon steel and stainless steel offered for the pin depending on corrosion exposure. A nylon or plastic body version of the same product form also exists in some ranges; it is not the same item as a zinc alloy anchor in either strength or corrosion behaviour, so the body material needs to be stated explicitly.
There is no property-class system for this product comparable to steel bolt grades. A claim of a “grade” on a hammer drive anchor therefore means whatever the individual supplier’s documentation says it means, and should be verified the same way as any other unspecified property.
Load ratings: why a universal number does not exist
It is common to look for a single load figure per size. For this product there is not one, and treating a catalogue value as universal is the fastest way to mis-specify it. Holding capacity depends on the compressive strength and condition of the base material, the drilled hole tolerance and depth, the presence of cracks or voids, the embedment achieved, edge distance and spacing, and whether the load is tension, shear or a combination of both.
Manufacturers that publish performance data therefore publish it with the test conditions attached. Anchor Fasteners Industrial states its zinc alloy hammer drive values for concrete of a specified strength and notes that safe working load should not exceed 25% of the stated ultimate values. Nova Fasteners sets out the same principle as a general rule — working load no greater than one quarter of average ultimate value, with a higher factor where loads are cyclic, fatigue or shock — and adds the geometry that governs any expansion anchor: minimum embedment, spacing of roughly ten anchor diameters, minimum edge distance of about five diameters, and a reduction for combined tension and shear.
Read together, those two sources describe how the capacity of a hammer drive anchor is established and why the figure travels with its test conditions. Unless a supplier publishes test data for the exact item, base material and load case in question, the anchor should be specified for its intended light-duty application rather than against an assumed capacity.
Hammer drive anchors compared with other light-duty anchors
Most specification errors come from treating anchors with similar names or similar appearances as interchangeable. They are not: each design changes where and how the anchor develops its holding force, and therefore what it can be used for.
| Anchor type | How it develops holding force | Typical position |
|---|---|---|
| Hammer drive / nail-in anchor | Hammer-driven pin splays the base of a zinc alloy body in a blind hole | Light static fixings in solid concrete and dense masonry |
| Split drive anchor | A pin is driven to expand the anchor’s base within the hole | Light fixings in solid masonry and block; a related but distinct design, not the same item |
| Drop-in anchor | Internal expansion cone is set with a punch, then a bolt or stud is threaded in | Medium-duty fixings where a bolt must be fitted, adjusted or removed |
| Wedge anchor | Torque on a threaded stud pulls a wedge up to expand a clip at the base | Higher-load structural connections in solid concrete |
| Hollow-wall anchor | Toggle, wing or screw-in body that bears on the back face of a hollow panel | Drywall and other hollow panels, including metal hollow wall anchors |
| Concrete screw | Thread cuts and grips the concrete directly; installs with a powered driver | Light to medium fixings in concrete where a removable, threaded fixing is wanted |
The two design families most often confused with a hammer drive anchor are the split drive anchor and the hammer-set screw anchor. Split drive anchors also use a driven pin, but as a separate, related design rather than the same item; hammer-set anchors may use a screw or threaded element that can be removed rather than a plain pin. Substitution also tends to run the wrong way: a wedge anchor belongs where the load or the substrate demands it, and a hammer drive anchor does not become a substitute for one by being the same diameter. Where the requirement is a removable, threaded light-duty fixing in concrete, a self-tapping concrete screw is the closer match than a nail-in anchor.
The terminology problem
The same product is sold under several names: hammer drive anchor, hammer drive pin anchor, drive pin anchor, pin drive anchor, nail-in anchor, nail drive anchor, nail-on anchor, hammer-set anchor, and simply concrete nail anchor. None of these names is protected or precisely defined, and they are used inconsistently between manufacturers and regions.
The confusion runs in both directions. Sometimes two different names describe the same zinc alloy, pin-driven item. Sometimes the same name covers a zinc alloy body with a hardened steel pin, a nylon body with a screw, or a threaded body that can be removed. Naming is not a reliable guide, so the decisive questions for a buyer are what the pin or setting element is, whether the anchor can be released, and whether the body is zinc alloy, steel or nylon — not what the line on the quotation is called.
Specifying or quoting a hammer drive anchor
Because there is no single governing standard to fall back on, a complete specification has to carry the information that a standard would otherwise supply. A workable enquiry or purchase order for this product includes:
- Anchor diameter and overall length, with the diameter stated as the anchor diameter and the matching drill hole size.
- Required grip range, expressed as the thickness of the material being fastened — not only the anchor length.
- Base material and its condition: solid concrete, dense block, brick or stone, and anything unusual about the substrate.
- Body material and electrical or corrosion requirements: zinc alloy is the default, and a nylon or steel body is a different product.
- Drive pin material and finish, particularly for exterior, wet or corrosive environments, where a stainless pin may be needed.
- Head style, so that the pin head suits the fixture: flat, countersunk, round or mushroom heads are matched to different bearing surfaces.
- Load expectation and whether it is static or subject to vibration, shock or cyclic movement.
- Whether the fixing is overhead or otherwise difficult to inspect and correct.
- Packaging, quantity and any requirement for material or coating documentation, since compliance with a specification such as A-A-1925A has to be confirmed per item rather than per product name.
An enquiry that states the fixture thickness and the substrate will usually resolve the item faster than one that quotes only a diameter and a length, because grip range and substrate suitability are the two variables that decide whether the anchor works at all.
The practical summary
A hammer drive anchor is a zinc alloy body with a hammer-driven pin that expands the body in a predrilled hole and clamps a light fixture against solid concrete or dense masonry. It earns its place where there are many identical light fixings to make quickly, and it fails where the substrate cannot resist the expansion force or the load is more than light duty. The three decisions that matter are the substrate, the grip range, and whether the fixing may ever need to come apart again. Get those three right and the product is simple; get any one wrong and no amount of care during installation will compensate. Buyers working through anchor selection more broadly may find it useful to review the full anchors range alongside this guide.