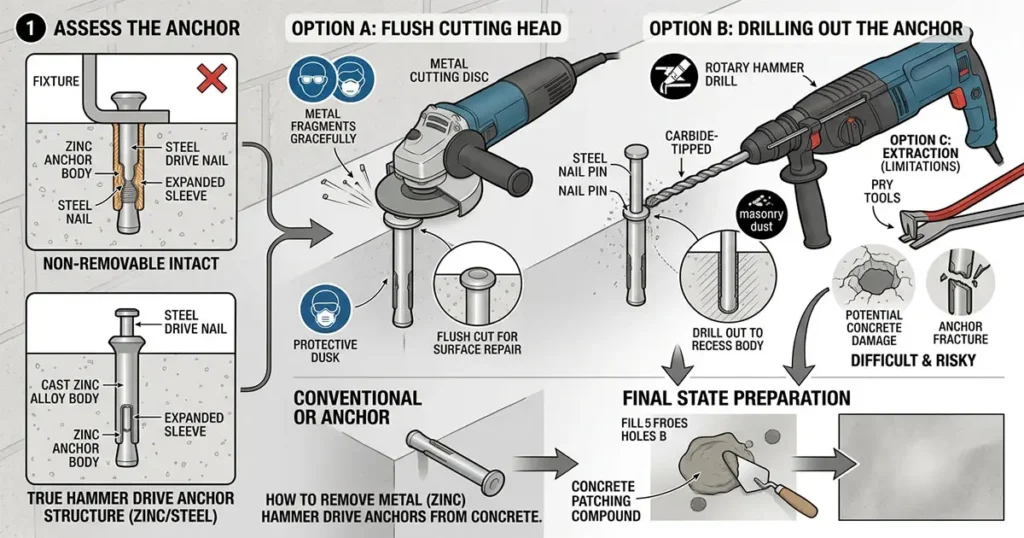
A conventional hammer drive anchor is a permanent fixing. Its body is expanded against the wall of the drilled hole by a drive pin that has no thread and no release, so there is nothing to unscrew and no way to relax the expansion from the surface. Removing one means cutting, pulling or drilling the anchor, and accepting that the concrete around it may be damaged in the process.
That does not make the job difficult, but it does make the objective decisive. Releasing a bracket, clearing a floor to a flat finish, and reopening a hole are three different jobs with three different methods, and the least damaging method for one is usually the wrong method for another. What follows is how to identify what is actually in the hole, then the removal options in the order in which they disturb the concrete.
Can a hammer drive anchor be removed?
For the conventional pin-drive type, yes, but almost never intact, and usually not completely. The anchor is designed so that the driven pin wedges the base of the body outward against the hole wall. There is no reverse action: the pin cannot be pulled back, the body cannot be collapsed, and the head is deliberately left without a slot or recess to turn. The fixing is meant to be permanent, and the practical question is which part of it has to go.
Answer that first, because it sets the method:
| What has to go | Method that fits | What is left behind |
|---|---|---|
| The fixture | Cut the body head off | Body and pin, standing proud by the fixture thickness |
| The exposed metal, flush with the surface | Cut or grind below the surface, then patch | Body and pin, recessed under the patch |
| The whole anchor | Pull it, or drill it out | A broken crater or an opened hole |
| A hole that can be used again | Drill out and clean, then patch or re-drill | A repaired hole, or a new hole nearby |
Most jobs stop at the first two rows. The anchor is usually in the way of a new fixture or a finished surface rather than holding something that has to be preserved, and releasing the fixture is a quick task with a cut-off wheel. Full extraction is the row that costs concrete.
Check the head before cutting: not every hammer-set anchor is permanent
Two products can look identical from a metre away and behave completely differently. The difference is at the head.
| What you see at the surface | What it is | What that means for removal |
|---|---|---|
| Smooth domed or flat head, pin head finished flush inside it, no recess | Conventional hammer drive (nail-drive) anchor | Permanent. Cut, pull or drill; nothing unscrews |
| Phillips, Torx or hex recess in the head | Hammer-screw or removable screw-drive anchor | The setting element is a screw; backing it out releases the grip, but the body may still have to be pulled or pried from the hole |
| Nut and washer on a threaded stud, body below the surface | Hammer-set or strike anchor | Remove the nut and washer, then drive the body down or cut the stud |
| Threaded rod or stud | Rod hanger or threaded anchor | Unscrew it if it turns; if it is part of the anchor, cut it and the body stays |
| One-piece body with a split base and no separate pin | Split-drive anchor; head design varies by model | Removal depends on the head and model. A duplex-head (double-head) version may be pulled with a claw hammer for temporary work; a flush or countersunk head usually has to be cut off. Follow the manufacturer’s instructions for the specific anchor |
The first two rows are the distinction that matters. A conventional hammer drive anchor’s head is tamper-resistant by design: no slot, no recess and nothing that will unscrew it, with the pin head finishing flush with or slightly below the body head. A hexagon-shaped head is not on its own proof of a removable anchor, because on a pin-drive product the hex is a finished head shape rather than a nut.
A hammer-screw anchor is a nail-drive anchor with a screw in place of the pin. The body is still an expanding sleeve, typically zinc alloy, but the setting element has a thread and a drive recess. Backing the screw out releases the anchor’s grip; it does not, on its own, remove the anchor. The body remains in the hole and the fixture remains around it, so the fixture and body are then pulled or pried out together. That is a design difference, not a technique. It cannot be applied to a plain pin-drive anchor, whose pin has no thread to turn, and it is why a pry bar should not be the first tool on an anchor whose head has a recess. The exact sequence should follow the product’s instructions, because it varies with the design.
Some removable variants carry their own limits. At least one hammer-screw product is explicitly not recommended for overhead, life-safety or sustained tensile loading without special consideration, so the data sheet still decides where the anchor may be used, not the fact that it comes out.
Removal methods, matched to what has to survive
Cut the head off to release the fixture
This is the method for the common case: the fixture has to come off and the hole does not. The body head is the only thing clamping the fixture, and it is thin, so a cut-off wheel removes it quickly.
- Support the fixture so that it does not drop or swing when the last fixing is cut.
- Shield the fixture face. Slide a thin metal scraper or a piece of sheet metal between the head and the fixture, so the wheel cannot run into the surface if it slips.
- Cut through the body head, parallel to the fixture face, with a 1 mm cut-off wheel in an angle grinder. Cut the flange, not the concrete, and stop as soon as the head separates.
- Lift the fixture away. The body and pin remain in the hole, protruding by the fixture thickness, or flush with the concrete if there was no fixture.
The risk in this method is not the anchor; it is everything next to it. A wheel that passes through the head and into the fixture leaves a gouge that cannot be repaired, and one that goes into the concrete cuts a groove and makes dust. Where a grinder will not fit, an oscillating multi-tool with a metal-cutting blade does the same job more slowly and with less risk to the fixture. A hacksaw works only if the head stands clear enough to reach.
Pull the remaining body out, sometimes
With the fixture off, the stub can be gripped. Locking pliers clamped hard on the body, a pry bar under what remains of the head, or a cold chisel driven under the flange will all start the anchor moving. Whether it comes out is a question about the concrete, not about the effort applied.
The expanded end is pressed against the hole wall along its embedded length, so pulling the body drags that expanded section through the concrete. In a sound slab the usual result is a cone of concrete that comes away with the anchor, or a body that tears off at the surface and leaves the expanded end in the hole. In block or brick, the face shell usually breaks first. Near an edge, the concrete fails before the anchor does and the corner breaks away.
Pulling works best on the smallest diameters, in older or weaker concrete, in hollow block where there is little for the expansion to grip, and on anchors that were set in an oversize hole, one of the installation errors covered in how to install hammer drive anchors. It is least reliable in a hard, sound slab. If the body spins but will not move, the expansion has already failed; the next step is the drill, not more leverage.
Drill the anchor out
Drilling is the method for a clear hole: when the anchor must be gone below the surface, when the stub is too short to grip, or when the body has broken off and left the expanded end behind.
- Centre-punch the pin, or what is left of it, so that the bit starts on steel rather than on the zinc ring around it.
- Drill the pin out with a high-speed steel or cobalt bit sized to the pin, at low speed with cutting oil. The pin is steel and may be hardened; a masonry bit is not made for steel, and a wood bit will be ruined by it.
- Drill the body with a bit at about the body diameter, clearing the flutes often. Zinc alloy cuts quickly but can smear and load the bit.
- Clear the hole and inspect it. If the bit wandered, the hole is now oversize or off-centre, and that decides whether it can be reused.
The drill follows the softest material it meets, which is why the pin comes out first and why a wandering bit is the main risk. Once it leaves the zinc and bites the concrete at the hole wall, it enlarges the hole off-centre and a new fixing has nothing true to sit in. The anchor’s diameter and embedment set the drill sizes, a relationship set out in hammer drive anchor sizes, and if the hole is going to be reused, drill it to the new anchor’s specified diameter only after the old body is out.
Expect the body to come out in pieces rather than as one part. The expanded end at the bottom is pressed into the concrete and may stay there; a smaller bit worked around its perimeter will free it, or the fragments can be driven below the surface and patched over.
Cut flush, recess and patch
If the hole is not needed, the least destructive option is to leave the body in place and take the metal below the surface. Cut the stub about 1–2 mm below the surface with a cut-off wheel or an oscillating tool, or drive it down with a pin punch if the hole has depth left below the anchor. Then fill the recess.
Patching is a small job that is done badly more often than a large one. Vacuum the dust out, dampen the hole if the patch is cementitious, and pack a non-shrink patching mortar or an epoxy putty in lifts, finishing flush with the surrounding surface. On a floor, a patch that stands proud becomes a trip edge; on a wall, it shows through paint unless it is feathered.
Two limits are worth stating. A carbon steel pin left a few millimetres under the surface can rust and stain a pale finish, so set it deeper or seal it. And a patch is a repair, not a restoration: on exposed or polished concrete, and on a wearing surface, the repair will be visible, and on a structural or fire-rated element the repair may need to be specified rather than improvised.
Move the fixing instead
When the only requirement is a new fixing near the old one, leaving the anchor and drilling a fresh hole is often faster and less damaging than removing it. Offset the new hole clear of the old anchor and of any cracked or spalled concrete around it, then let the new anchor’s own edge and spacing requirements govern the position. Check that the fixture’s slot or hole pattern allows the move before drilling.
This is also the sensible answer when the old fixing is in a bad location. A point that has already spalled once is not improved by drilling it again.
What removal does to the concrete
The anchor is designed to load the concrete, so the concrete usually fails first. A pull-out takes a cone of concrete from the embedded end to the surface, and the anchor often comes out with the cone attached. Prying concentrates the force at the surface instead, where the concrete is in tension and the cover over reinforcement is thin, so the hole edge lifts and spalls before the anchor moves.
Either way the crater is wider than the anchor, and the concrete around it has been disturbed. A new fixing placed back into that zone cannot develop the grip it would have had in sound concrete, which is the practical reason to relocate rather than re-drill. Near a corner or an edge the corner can break away entirely, and on a thin section such as a topping, a block face or a slab soffit there may be nothing left to hold a replacement.
Published load values do not survive this. Where a hammer drive anchor has capacity figures, they are test results for a specific installed configuration, and ASTM E488/E488M sets out the test methods used to establish the tension and shear strength of anchors in concrete. A cut, pried or partly drilled anchor is no longer that configuration, so its published value no longer describes it, which is one more reason a removed anchor is not reinstalled.
Dust, sparks, fragments and the tools that make them
Every method above produces at least one of three hazards, and usually two at once.
Dust. Cutting, grinding and drilling concrete and masonry generate respirable crystalline silica, particles fine enough to stay airborne and reach the deep lung. HSE’s guidance on silica in construction notes that concrete, mortar and brick all contain silica, that cutting, drilling and grinding release it, and that heavy or prolonged exposure can cause silicosis and lung cancer. The dust is too fine to see in normal light, so a clear-looking work area is not evidence that the air is clean.
Water suppression or on-tool extraction is the first control. Washington State’s silica guidance lists water delivery or an attached vacuum as the usual engineering controls and notes that respirators may still be needed; its standard sets an action level of 25 µg/m³ and a permissible exposure limit of 50 µg/m³, both as 8-hour time-weighted averages. Clean up with a HEPA vacuum or wet methods rather than dry sweeping, which puts the dust back into the air.
Fragments and sparks. A cut-off wheel throws hot metal and abrasive fragments at speed, and a wheel that shatters sends them in a wide arc. A face shield over safety glasses, not instead of them, is the minimum. Sparks also start fires, so grinding in a plant or a finished building usually needs a hot-work permit, a cleared area and a fire watch, and the anchor head itself can be hot enough to burn after cutting.
The tool. Use the guard, use the wheel the tool is rated for, and never cut with the side of a cut-off wheel. Let the tool reach full speed before contact, keep both hands on it, and isolate the power before changing a wheel or a bit. Where the anchor is overhead, clear the area below: the pin, the cut head and the dust all fall.
When to stop and have the fixing assessed
Some anchors should not be removed as a maintenance task. A hammer drive anchor is a light-duty fixing, normally used for light static loads, but the one in front of you may be carrying a guardrail, a fall-arrest point, an overhead service, a fire-rated suspension, a machine base or a structural connection. The fact that it looks like a light-duty anchor does not settle what it is doing.
Stop and get the fixing assessed if any of the following applies:
- the anchor is part of a structural connection, a safety-critical fixing, or anything overhead that could fall;
- the fixing point is close to reinforcement, embedded conduit or post-tensioning that has not been located;
- the slab is post-tensioned, because tendons carry high tensile load and cutting one can release stored energy violently;
- the concrete is cracked, the anchor is close to an edge, or the area has already spalled;
- the anchor passes through or supports a fire-rated assembly or fire-protection services;
- the work is inside a plant, a tenancy or a warranty scope where a permit or approval is required.
In those cases the question is not which removal method to use, but whether the fixing can be removed at all without an engineered replacement. That is a decision for the responsible engineer, not for the tool.
If the fixture may have to come off again
The cheapest removal is the one designed in. If a fixture is likely to be adjusted, replaced or taken down, the anchor choice belongs in the specification, because a permanent pin-drive anchor cannot be converted into a removable one afterwards.
- Hammer-screw (removable screw-drive) anchor. Hammer-set speed with a screw in place of the pin; a Phillips, Torx or hex driver backs it out. Check the item’s published load values and its overhead and life-safety limits.
- Concrete screw anchor. Cuts a thread into the concrete and can be backed out. The hole can be reused, but holding values can deteriorate when a screw is reinserted into the same hole.
- Sleeve or wedge anchor with a nut. The nut and fixture come off, and the stud can be cut or the body driven below the surface.
- Drop-in anchor. A female thread set flush; the bolt unscrews and nothing protrudes above the surface, although the anchor itself stays in the concrete.
Removable does not mean unlimited. A screw-driven anchor is still an expansion anchor, and repeated removal and reinstallation wears the hole. The manufacturer’s data, not the label, sets what it will hold, and where the fixture is heavy or the load is not purely static, a threaded anchor that can be inspected and re-tensioned is usually a better specification than a drive anchor of any kind. The standard pin-drive range is covered on the hammer drive anchors page, and the drop-in anchors page covers the flush female option.
Work out what has to survive — the fixture, the surface or the hole — and the method follows. Check the head for a drive recess first; if there is one, back the screw out, then pull or pry the fixture and body out as the product’s instructions describe. If there is not, cut the head to release the fixture, then decide whether the stub can be pulled, has to be drilled, or can be cut below the surface and patched. Control the dust and sparks before the first cut, leave structural, overhead and post-tensioned fixings to an engineer, and specify the removable variant next time if the fixture will come off again. The full range sits in the anchors category.