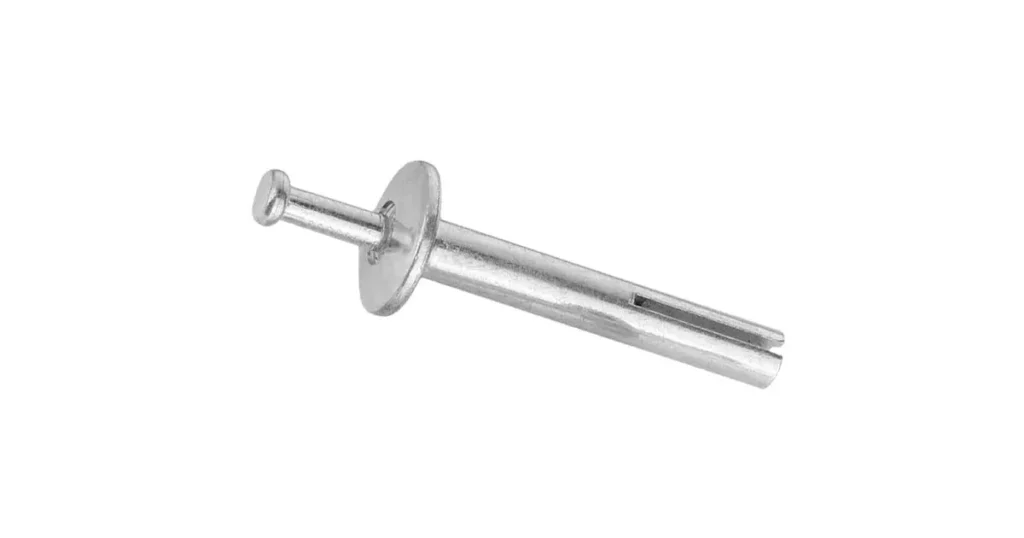
Installing a hammer drive anchor in concrete means drilling one hole at the diameter and depth the anchor’s own documentation gives, cleaning that hole out, passing the anchor through the fixture until the body head bears on it, and striking the drive pin until it is seated and its head finishes flush with, or slightly below, the body head. Nothing is torqued and nothing is adjusted afterwards: the pin travel is what expands the base of the body against the wall of the hole and clamps the fixture in one movement.
There is no universal installation specification for this product family, and that is the first thing to accept. Drill diameter, hole depth, minimum embedment, grip range, base-material suitability and the finished position of the pin all belong to one manufacturer’s design, and the same trade name is used for products whose setting action and final position differ. The figures that matter therefore have to be read from the item’s data sheet or installation instruction before the drill comes out: the drill hole diameter, the required hole depth, and the minimum embedment or grip range that goes with the fixture being fastened.
This guide sets out the sequence step by step, explains what each step is protecting, shows how to recognise a set that has gone wrong, and separates the standard nail-drive anchor from the other hammer-set systems it is routinely confused with. The product itself — how the body and pin develop their hold, where it suits, and when another anchor type is the better choice — is covered in what hammer drive anchors are and where they are used.
What has to be confirmed before drilling
Four checks prevent most installation failures, and all four take less time than re-drilling a fixing point:
- The anchor matches the fixing. Nominal diameter and overall length, plus the grip range or fixture thickness the item is intended for. A length that reaches the base material but falls outside its stated fixture-thickness window sits outside the configuration the manufacturer publishes.
- The base material is suitable and sound. A hammer drive anchor holds by radial pressure against the wall of the hole, so it needs a solid, dense material that can resist that pressure — normally concrete, dense block, brick or stone, as listed for the specific product. Hollow block, cored masonry, low-density or porous concrete, and cracked or spalled areas cannot develop the same reaction.
- The fixing point is clear of obstructions. Reinforcement, embedded conduit, previous holes and the proximity of edges or adjacent fixings all affect whether the hole can be drilled where the design intends. A hole that has to be moved to avoid a rebar strike is a hole whose edge distance and spacing no longer match the plan.
- The tooling is right. A rotary hammer with a carbide-tipped masonry bit of the specified diameter, in good condition, plus a hammer, plus whatever hole-cleaning equipment the instructions call for. Carbide-tipped masonry drills are the subject of a published American National Standard, ANSI B212.15, Cutting Tools — Carbide-Tipped Masonry Drills and Blanks for Carbide-Tipped Masonry Drills, which is the equipment category these anchors are set with.
Two of those checks are documented rather than assumed, and the documentation is worth asking for. Once the pin is driven, the drilled diameter, the hole depth and the cleanliness of the hole can no longer be inspected directly, because the anchor covers the hole. That is a limit on visual inspection, not on verification as a whole: where the application and the governing requirements call for it, the installed anchor can be field-tested — a pull or proof-load test to a specified load, carried out by the method the manufacturer or the project specifies. Field testing does not replace correct product selection, the installation requirements, or the pre-drill checks above: it confirms that a fixing already installed to those requirements performs as required, and it cannot tell you whether the hole was drilled to the right diameter or depth in the first place.
The installation sequence
In order, and with the requirement that governs each step:
- Drill the hole. Correct diameter, correct depth, kept perpendicular to the surface.
- Clean the hole. Remove drilling dust and debris completely, by the method the anchor’s instructions specify.
- Prepare the fixture. Its hole must clear the anchor body at the size the manufacturer states — not merely pass the drive pin.
- Insert the anchor through the fixture into the hole, so that the head of the body seats against the fixture face.
- Drive the pin with a hammer until it is fully seated, in the finished position the instructions describe.
- Check the set before moving on: pin seated, body head bearing, fixture immovable.
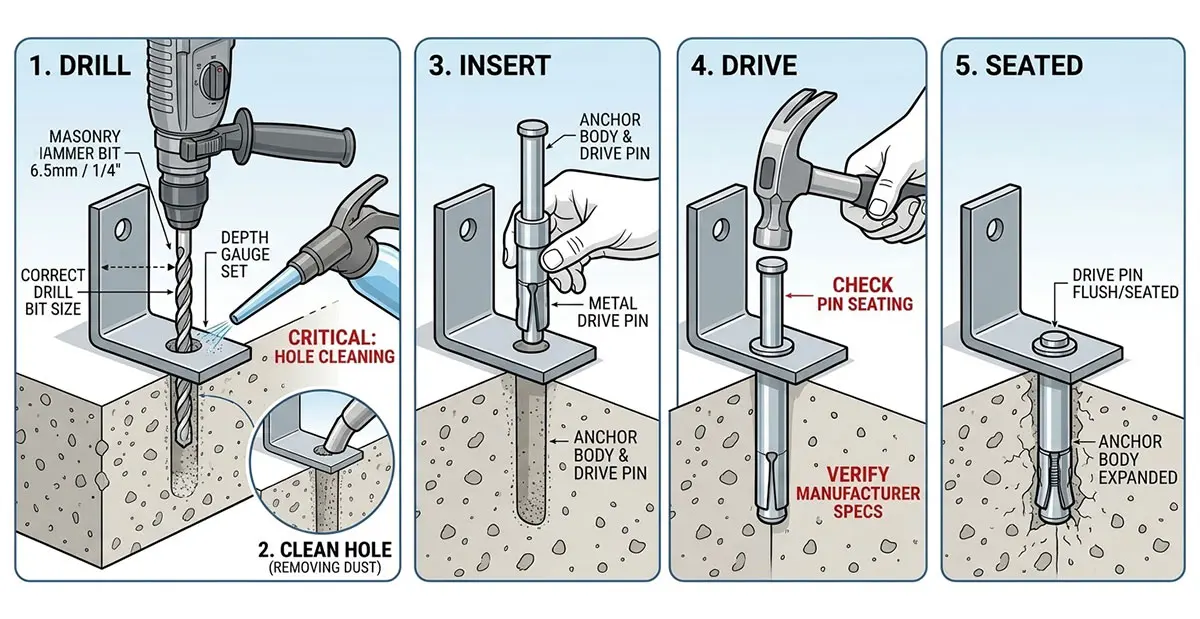
The steps are short, and that is the point of the product. The steps that get skipped are almost always step 2 and the depth in step 1, because both are invisible once step 5 is complete.
Drilling: diameter, depth and the perpendicular hole
The drilled diameter is not the nominal size by default. In inch sizes the two often carry the same number, so a 1/4 in. anchor goes into a 1/4 in. hole; in metric tables the drilled diameter is listed separately and may differ from the body size. The figure to drill is the one in the item’s table, not the number on the label.
The same rule covers the bit. A worn carbide bit drills oversize, and an oversize hole reduces the contact the expansion relies on. Hole size is treated as a performance variable rather than a tolerance detail in ACI CODE-355.2, Post-Installed Mechanical Anchors in Concrete — Qualification Requirements and Commentary, whose reliability test programme includes tests with a large drill bit in low-strength concrete and with a small drill bit in high-strength concrete. Those tests exist because the drilled hole changes what an expansion anchor does. A hammer drive anchor is not a structural anchor and is not qualified under that framework; the reason the hole matters is the same in both cases, because both develop their hold against the hole wall.
Depth has one requirement and one allowance. The hole has to be at least as deep as the embedment the anchor will achieve once the fixture is in place, plus any allowance the instructions add. Drilling deeper is the practical way to avoid the anchor bottoming out: if the body meets the bottom of the hole before the fixture is clamped, the pin cannot reach its finished position and the anchor will look installed while contributing little. Set the depth deliberately — mark the bit, use the drill’s depth gauge or a stop — rather than judging it by eye.
Drill perpendicular to the surface. A hole drilled at an angle tilts the body in the hole, so the bearing face of the body head no longer sits flat on the fixture, and the expansion acts unevenly around the circumference. In the common case of a hammer drill with a dust-extraction or depth-gauge accessory, checking the accessory does not hold the bit off the intended line is part of setting the depth correctly.
Cleaning the hole is not optional
Dust left in the hole occupies the ring of space the anchor needs, holds the body off the bottom, and packs under the expanding end instead of letting it bite the hole wall. The result is an anchor that seats short or fails to expand properly. Cleaning is a required step in the instructions for these products, and the method that satisfies it differs by product: some specify blowing the hole out, some brushing and blowing, some both in a stated order, and some rely on the dust-extraction system on the drill where the anchor’s approval permits it. Follow the method written for the item rather than the one that is quickest.
How much difference hole conditions make is not a matter of opinion. WorkSafe Queensland’s safety alert on the safe support of overhead services followed two 2018 failures of post-installed insert anchors — including cheap hammer-in anchors used where the manufacturer stated they were unsuitable for an overhead application — and lists anchors installed in holes that are oversized, too shallow, or drilled in concrete that is cracked or damaged among the causes of insert anchor failure, together with installation that does not follow the manufacturer’s instructions. It also notes that a hammer-in type of insert anchor may not be intended for the application at all, which is a specification decision made before installation rather than during it.
Fixture preparation and inserting the assembly
The fixture needs its own hole, and it is not the same hole as the one in the base material. It must clear the anchor body at the diameter the manufacturer states. A hole sized only to pass the drive pin will not let the body through, and the anchor cannot be set at all. Where the fixture is a slotted bracket, confirm the anchor’s grip range covers the material thickness at the fixing point: a slot can be thicker or thinner at the bearing edge than the nominal section, and the body head must bear on the fixture rather than bridge a slot.
Insert the anchor through the fixture and into the hole until the body head seats on the fixture face. The anchor is normally supplied with the pin already started in the body, so the assembly goes in as one piece; keep it square to the hole as it enters, because forcing a misaligned body damages the hole wall before the pin has done any work. If the anchor will not enter freely, the cause is a hole diameter or depth problem or debris, not something to be solved with the hammer.
Driving the pin, and stopping at the right moment
Drive the pin with a hammer until it is fully seated, and check the finished position the instructions state — commonly flush with, or slightly below, the head of the anchor body. The purpose of the blow is to make the pin travel far enough that the base of the body expands against the hole wall; once the pin is seated, further striking has no work left to do. Continuing past that point adds no holding capacity. In weaker masonry it damages the material around the anchor, and because the pin is not designed to be withdrawn and reused, an over-driven anchor in a damaged hole usually means relocating the fixing.
Two habits make the setting more consistent. Use controlled single strikes and check the pin between them, rather than a rapid series of blows; and hold the anchor square to the surface while driving, so the pin travels straight down the body. Where an item is supplied with a setting tool, the tool exists to keep the pin centred and the force axial, and it should be used. Where the product documentation permits overhead use and the load basis supports it, keep the area below clear while driving and inspect each fixing as it is made rather than at the end of the run — but treat that as working practice on a permitted application, not as what makes the application acceptable.
What a correctly installed anchor looks like
Inspection of a hammer drive anchor is visual and immediate, which is why the set has to be checked as it is made. A completed installation shows:
- the drive pin seated in the position the instructions specify, not standing proud of the body;
- the body head bearing flat and firm on the fixture face;
- no movement in the fixture when it is pulled or rocked by hand;
- no cracking, spalling or spidering of the base material around the anchor;
- no crushed or enlarged hole edge, which is the visible sign that the hole was oversize or the material too weak to resist the expansion.
Any anchor that fails one of those checks should be treated as not installed, not as installed with a caveat. There is no torque to re-apply and no adjustment to make afterwards.
Common installation mistakes and what they indicate
| What goes wrong | What it indicates |
|---|---|
| Pin stands proud of the body and will not go further | The anchor is bottoming out in a hole that is too shallow, or the hole is packed with dust; the body is not seated on the fixture |
| Pin seats, but the fixture still moves | The hole is oversize or the bit was worn, the base material is too weak or hollow at that point, or the grip range does not match the fixture thickness |
| Anchor spins or the hole edge crumbles as the pin is driven | The hole is oversize, the material is porous or hollow, or the anchor has been driven past the point where the expansion is useful |
| Body head does not sit flat on the fixture | The hole was not drilled perpendicular, or the fixture hole is undersized and the body is not fully through it |
| Cracking around the anchor | The base material is too weak or cracked, the fixing point is too close to an edge, or the anchor was over-driven |
| Anchor drops through the fixture hole | The fixture hole clears the body but not the head — the body head has to bear on the fixture, not pass through it |
Most of those outcomes trace back to a decision made before the pin was struck: the wrong hole diameter, the wrong depth, an uncleaned hole, or the wrong anchor for the fixture and substrate. One more mistake is worth stating separately, because it is a specification error rather than an installation error — treating the anchor as reusable. Once the pin has been driven, the body is wedged against the hole wall and the fixing is effectively permanent. If a fixing point may need to be shimmed, re-tensioned or taken apart, the anchor type is wrong for the job rather than the installation being at fault.
Nail-drive anchors compared with other hammer-set systems
Similar names cover different products, and a procedure taken from one is not transferable to another. The main distinctions that change the installation:
| Product | Setting element | Finished installation |
|---|---|---|
| Nail-drive anchor (the standard hammer drive type) | A drive pin or nail, normally supplied pre-started in the body | Pin driven fully home and checked for the finished position the manufacturer states; no torque applied |
| Split-drive anchor | A one-piece anchor whose base is split; the whole anchor is driven into the hole, with no separate drive pin | Related design with its own setting requirement; its own seating position applies, and a tool or anchor from another design is not a substitute |
| Hammer-set / impact anchor with a threaded element | A nut and washer, or a screw element, set or tightened after the body is placed | Set with a hammer and then tightened by wrench or driver to the stated torque; it can be adjusted or removed later |
| Screw-type concrete anchor | A powered driver and a thread that cuts into the concrete | No drive pin; installed and checked by driver, not by hammer, with its own hole and embedment requirements |
The practical test is what the setting element is and whether anything is tensioned afterwards. A nail-drive anchor is finished when the pin is seated; a nut-set or screw-set anchor is finished when the torque is applied and checked, and installing one as if it were a plain pin — or the reverse — leaves the fixing in a state neither product’s instructions describe. The dimensional data for the specific design is also not interchangeable, and the size arithmetic for this product is set out separately in hammer drive anchor sizes, including how diameter, length, fixture thickness and embedment relate.
Before the work starts: what has to come from the anchor’s documentation
A hammer drive anchor has no single international dimensional product standard covering everything sold under the name, so the installation data has to travel with the item. Two documents do exist for parts of the family and are worth knowing about, because they show how the requirements are held. China’s national standard for expansion anchors in concrete, GB/T 22795-2008, Expansion anchors for use in concrete — Type and dimension, includes a nail-driven expansion anchor type, designated JD, alongside threaded expansion anchors, and sets out types and basic dimensions rather than installation figures for every product that shares the name. The current Chinese building-industry product standard for mechanical anchors in concrete is JG/T 160-2017, in force since 1 December 2017. Neither document removes the need to read the item’s own installation instruction, and published performance values in any market are tied to the test conditions they were measured under, which is the basis of test methods such as ASTM E488/E488M, Standard Test Methods for Strength of Anchors in Concrete Elements. Hole features, embedment and installation are part of what those values depend on.
So the list to have in hand before drilling is short, and it comes from the manufacturer’s data sheet or installation instruction for the exact item: the drill hole diameter, the required hole depth and any allowance, the minimum embedment or the grip range for the fixture thickness in front of you, the cleaning method, the finished position of the pin, and the base materials the product is stated to suit — including whether it is rated for the orientation you are working in.
Read those figures against the fixing rather than against the product name, and the installation is as reliable as it is quick. The parts that decide the outcome — hole diameter, hole depth, a clean hole, a fixture hole that clears the body, and a pin driven fully home and then left alone — are decided before the hammer is picked up. Buyers and installers working through the rest of the range can review the full anchors category alongside the item’s documentation.